Polymesh Node Operator Guide
Introduction
Operators perform critical functions for the network and have strict uptime requirements. This document provides information about the recommended setup and maintenance of a Polymesh operator node. The intended audience is the operator's IT team; however, some business considerations have been included for completeness and to provide the necessary context.
Governance
Polymesh is a permissioned network, meaning potential operators must undergo a governance process to be permitted to work with the Polymesh network. This governance process is on-chain and managed via the Polymesh Improvement Proposal (PIP) mechanism.
Becoming an Operator
The node operator role on Polymesh requires a permission to be assigned. All operators must satisfy selection criteria determined by Polymesh and be approved by the Polymesh Governing Council.
To become an operator on Polymesh, you also need to bond (lock) POLYX in the system. This facilitates the economic incentives on which Polymesh's security relies. The account that stores your bonded POLYX is called the Stash account, while the account that manages the bonded POLYX is called the Controller account. Rewards generated for running an operator node can be sent to the Stash account or another specified account.
You do not need to bond all the POLYX in your Stash account and can bond more later. However, withdrawing any bonded POLYX requires waiting for the unbonding period, currently set at 28 days.
Key Management
NB: It is recommended that operators use Ledger Nano S Plus, Nano X, Flex or Stax devices to store their keys. The discontinued Ledger Nano S should NOT be used.
The Nano S does not support setting session keys and is therefore unsuitable for operators.
There are three main types of keys that an operator must manage:
- Session keys
- Controller key
- Stash key
The session keys are the only type of key that the operator node needs access to. The other two keys should be securely stored in a supported hardware wallet.
Session Keys
Session keys are used by the operator node to sign data necessary for consensus. These keys are stored on the operator node itself. Although session keys do not hold any funds, they can be used to perform actions that could result in penalties, such as double signing. It is therefore critical to keep these keys secure.
Session keys can either be generated offline and injected into the operator node or generated within the operator node by calling the appropriate RPC method. Once generated, session keys should be persisted.
Session keys must either be stored within the client or mounted from secure storage via external methods.
Permissioned Identity
For validator node operations, stash keys must be linked to a DID that is assigned the operator role, making it a permissioned identity. Only keys linked to that permissioned identity can be used as Stash keys.
Primary key
This key is a special key under the onchain identity. It has additional capabilities of adding and removing secondary keys from an identity. It cannot access POLYX on secondary keys. It is recommended to keep the Primary key as in a cold wallet and NOT use it as a stash key.
Secondary keys
Secondary keys are authorized by a primary key to join an identity. For the purposes of staking/POLYX transfers they are no different to primary keys. Secondary keys can be given permissions to perform specific onchain actions. e.g. they may be allowed to interact only with specific assets, only with specific portfolios or only use specific transactions.
Stash Key
The stash key is the account that holds the POLYX bonded by the operator and, optionally, receives operator rewards. This should be a cold wallet and must never be attached to the operator node.
Stash keys can be either a primary or a secondary key but MUST be linked to the permissioned DID of the operator.
Stash keys can:
- Bond POLYX
- Bond extra POLYX
- Set the Controller key of the stash. If a controller key is not provided the Stash key is automatically made the Controller.
Controller Key
The controller key is used to manage bonded funds, vote with bonded funds, and perform similar on-chain actions. This key is not directly required by the operator node and should never be shared with it. It is recommended to use a multisig account or a supported hardware wallet for the controller key. These keys can hold funds and directly control bonded funds, so they must be stored securely. Consider the controller key a semi-cold wallet.
Controller keys can be a Primary or Secondary key and can be associated with any identity. They do not need to be associated with the permissioned identity of the Stash.
Controller keys can:
- Set/update session keys
- Set commission and validate
- Set a destination for reward payments - i.e. stash with automatically stake, stash unstaked, controller or other account.
- Commence unbonding of stash tokens
- Withdraw unbonded tokens after the 28 day waiting period to the stash account. i.e. the controller cannot transfer unbonded tokens from the stash.
- Rebond tokens which are in the process of unbonding
- "Chill" the node i.e. gracefully stop validating after the last era the node was elected to ends.
- Purge Session keys
Network Architecture
The recommended secure operator setup for Testnet/Mainnet includes the following:
- An active operator node configured with session keys
- A warm spare operator node configured like an operator node but without session keys
A minimum setup consists of a single operator node.
The --reserved-only flag, combined with the --reserved-nodes parameter, allows you to restrict connections to a whitelist of nodes that the operator node may peer with.
Firewall Traffic
To function properly, Polymesh nodes require the following traffic to be whitelisted:
-
All Nodes:
-
Port 443 Egress (HTTPS) (optional but recommended): Used to send basic telemetry to Polymesh servers. Enabling telemetry allows your node to appear on the Polymesh Telemetry page.
-
NTP Egress: System clock drift can cause a node to fail to produce blocks due to mismatched timestamps. Ensure your nodes are synchronized with a reliable NTP server.
-
-
Operator Nodes:
- Libp2p Ingress/Egress: Operator nodes must send and receive P2P events from the WAN or a trusted set of nodes with WAN connectivity. (Default Port: 30333)
High Availability
Operator Node High Availability
The network tolerates simultaneous outages of multiple operator nodes, provided a critical threshold is maintained. An operator node can experience brief downtime for maintenance or upgrades. However, frequent or prolonged downtime—or outages of multiple nodes simultaneously—risks incurring slashing penalties.
Only one operator node may be active with the same session keys at a time. If multiple operator nodes with identical session keys are online simultaneously, they may sign conflicting blocks, resulting in equivocation penalties. Therefore, automatic failover is discouraged. Instead, maintain a warm spare node for supervised failover.
Two failover methods are available:
- Shared Session Key: The session keys are shared with the warm spare, which is activated if the primary node fails. The primary node must not come back online. The penalty for equivocation is much higher than for being offline.
- Unique Session Key: Each operator node instance has a unique session key. If the primary node fails, the controller must update the session keys on-chain for the secondary node. As key changes take effect in the next session, there may still be a period where the node is offline for one session. This method eliminates the risk of equivocation penalties.
Storing controller keys on a server for automated key change transactions is not recommended. However, you may pre-sign an immortal transaction (without a timeout) and store it on a server to broadcast if the primary node fails. See Upgrading or Replacing a Node for details.
Getting the Polymesh Node Software
All Polymesh nodes use the same binary, differing only in runtime parameters.
There are several ways to obtain the node binary:
-
Prebuilt Container Images: Fetch from the Polymesh Docker Hub repository. Two flavors are available:
debian(with a shell for easier debugging) anddistroless(reduced attack surface, no shell). Images are tagged as<flavor>or<flavor>-<version>. Use versioned tags for deterministic updates. See our sample Docker Compose files. Refer to the Polymesh Developer Documentation for a guide to running a Polymesh node with Docker. -
Precompiled Binary: Download from the GitHub releases page. Releases include the Polymesh binary, its checksum, and optional runtime archives. The runtimes are already included in the binary.
-
Build from Source: Clone the release branch and follow the repository instructions to compile the binary.
Node Resource Requirements
At the time of writing, each Polymesh node should have the following minimum resources:
| Resource | Minimum Value | Recommended Value |
|---|---|---|
| CPU | 2 CPUs | 4 CPUs |
| RAM | 8 GB | 8+ GB |
| Storage | 250 GB SSD | 400+ GB low-latency SSD (e.g., local NVMe) |
As the blockchain grows, storage requirements will increase. Ensure sufficient spare storage or expandable volumes and monitor disk usage. A long-running node accumulates write-ahead logs (WAL) in the database directory. These logs are compacted upon node restart. Reserve an additional 40 GB of disk space for WAL.
Running multiple nodes on shared resources is not recommended. For example, it is preferable to run two 2-CPU/8-GB RAM instances (one node each) than a single 4-CPU/16-GB RAM instance hosting two nodes.
Securing the Instances
Best practices for securing your instances should always be followed. These include (but are not limited to):
- Disabling password-based SSH access
- Setting up and enabling a network firewall
- Only opening required ports
- Disabling unnecessary services
- Avoiding the use of the root user and disabling root login
- Keeping your system up to date
- Enabling SELinux
- Monitoring logs and metrics for signs of malicious activity
- Running periodic CIS benchmarks against your systems
Be advised: Due to the constantly evolving cybersecurity landscape, the above list is not, and cannot be, comprehensive. Node operators are responsible for ensuring that their nodes remain secure and adhere to current best practices.
Upgrading or Replacing a Node
Operator Node Upgrades
The recommended process for upgrading operator nodes is to perform a failover to the warm spare operator node. As mentioned in the High Availability section, the unique key approach is preferable to the shared-key approach.
Begin by upgrading the warm spare operator node. Since this node is not actively validating, you can stop the Polymesh client, perform the necessary upgrade, and then resume operation.
Once the warm spare node is upgraded and fully synchronized, make it the active node by submitting a change of session keys associated with your stash to those stored in the warm spare's keystore, using your controller account.
To do so:
- (If not already done) Generate a new set of session keys for the warm spare operator node.
- Navigate to Staking > Account Actions.
- Click "Set Session Key" for your bonding account.
- Enter the
keysvalue from the warm spare node and provide the associatedproof, then click "Set Session Key."
See Running an Operator Node for instructions on using the author_rotateKeysWithOwner RPC method to generate session keys and ownership proof.
The change in operator session keys will only take effect in the next session. For safety, we recommend waiting at least two sessions before proceeding. If the current session is N, wait until session N + 2 before continuing.
At this point, the warm spare and active operator nodes will have switched roles: the previous warm spare becomes the active node, and vice versa. Ensure they are treated accordingly going forward. Alternatively, you may perform the failover operation again to restore the original active node as the current active node and the original warm spare as the current warm spare.
If a warm spare is unavailable, you may perform an in-place upgrade by stopping the Polymesh client, performing the necessary client upgrade, and restarting the node client. We do not recommend in-place upgrades due to the risk of encountering a failure during the upgrade.
Backing Up a Node
Since Polymesh is a public blockchain, node backups are not strictly required, as you can always synchronize from scratch. However, syncing from scratch can be time-consuming. To minimize the delay between node creation and readiness, you may choose to back up the full blockchain database regularly.
This does not need to be done for every node—a single database backup can be used across nodes, provided they use the same pruning settings. In v8, all nodes including operators use the same default pruning: --state-pruning 256 and --blocks-pruning archive-canonical. These defaults are appropriate for consensus participation. If you create backups with these settings, they can be shared across operator nodes.
Database backups should be performed on an offline node. A typical approach is:
- Stop the Polymesh process on the backup node.
- Snapshot the database directory.
- Restart the Polymesh process.
- Sync the database snapshot to offsite storage.
The database snapshot contains no confidential information as long as only the db directory is backed up (e.g., /<base path>/chains/mainnet/db).
Because the database uses file-based storage, stopping/starting Polymesh may create partial files. Excessive file accumulation can cause performance issues. We recommend limiting snapshots to daily intervals and periodically resetting the backup node's database with a fresh sync from the chain.
Auto-Restarting Nodes
Nodes should automatically restart in the event of an intermittent failure.
Container-Based Nodes
For container-based nodes, use your container runtime's features:
restart_policy.condition: anyfordocker-composerestartPolicy: Alwaysforkubernetes
Binary-Based Nodes
For binary-based nodes, we recommend using a supervisor process. Most modern Linux distributions use systemd, which we will focus on, though other options are also viable.
Setting Up systemd
-
Create a new unit file called
polymesh.servicein/etc/systemd/system/with the following content:[Unit]
Description=Polymesh Node
After=network.target
[Service]
User=polymesh
Group=polymesh
Type=simple
Restart=always
RestartSec=5
ExecStart=/usr/local/bin/polymesh --chain mainnet --name <your-node-name> --validator
[Install]
WantedBy=multi-user.target -
Enable automatic startup with:
sudo systemctl enable polymesh -
Manage the service with commands such as:
sudo systemctl start polymesh
sudo systemctl stop polymesh
sudo systemctl restart polymesh -
View logs using
journalctl:sudo journalctl -u polymesh -f
Refer to the journalctl man pages for additional details.
Common Parameters for Running a Polymesh Node
Recommended options for running a Polymesh node include:
--name <name>(optional): Human-readable name reported to telemetry services.--chain mainnet: Run a Mainnet node (default is Testnet if omitted).--wasm-execution compiled: Use compiled WASM for better performance.--base-path <path>(optional): Specify the location for DB files and the keystore.--node-key-file <path>(optional): Use an explicit node key path when you manage node key outside the default "network" folder.--db-cache <cache size in MiB>(optional): Increase in-memory cache for better performance. On a node with 8GB of available RAM, a reasonable value is4096. (default128MiB)--db-max-total-wal-size <WAL database size in MiB>(optional): Limit the total storage capacity that the database can use for WAL files. Recommended minimum value1024.--state-pruningand--blocks-pruning(optional): Configure pruning behavior. Refer to Configuring Pruning for details. The v8 defaults (--state-pruning 256and--blocks-pruning archive-canonical) are appropriate for operator nodes.
Note: The <name> parameter will be publicly visible when telemetry is enabled (default setting).
To see a full list of available options and their descriptions, run the --help command.
Running an Operator Node
To run an operator node, use the following in addition to the common parameters:
--validator: Enable validator mode.
To connect only to trusted peers, use these options:
--reserved-only: Restrict connections to reserved peers.--reserved-nodes: A space-separated list of libp2p peer addresses in the format/ip4/<IP>/tcp/30333/p2p/<Node ID>or/dns4/<Hostname>/tcp/30333/p2p/<Node ID>. If omitted, peers must be added via thesystem_addReservedPeerRPC method.
For validator operations, keep a stable node key persisted under your --base-path. With default settings, the node key is stored in the chain-specific network folder:
/<base-path>/chains/<chain-name>/network/secret_ed25519
If the key is stored in this default location, you do not need to pass --node-key-file.
Use --node-key-file when you intentionally store the node key in a custom location.
For testing you can avoid separate key generation by using --unsafe-force-node-key-generation. This forces key generation if the node-key-file does not exist on container start, which is useful for testing but not recommended for production.
--unsafe-force-node-key-generation is considered unsafe for active authorities because identity changes can break connectivity with peers that expect a stable peer ID.
Generating and Inspecting Node Keys
Before starting a validator, generate and verify the node key explicitly.
Generate a node key in the default chain network location under your --base-path:
polymesh key generate-node-key --base-path <base-path> --chain mainnet
With --base-path <base-path> and --chain mainnet, this writes the key to:
<base-path>/chains/mainnet/network/secret_ed25519
If you run testnet, the path is:
<base-path>/chains/testnet/network/secret_ed25519
Inspect the key and print the peer ID:
polymesh key inspect-node-key --file <base-path>/chains/mainnet/network/secret_ed25519
If you keep the key in the default location, no explicit node-key argument is required at startup. Use --node-key-file only when you intentionally store the key in a custom path.
Next, generate the node's session keys.
Generating Session Keys with Access to the Node's RPC Port
Use author_rotateKeysWithOwner to generate session keys and the required ownership proof in one call.
The owner parameter must be your stash AccountId in hex format: 0x + the 32-byte raw public key bytes. An account transformation tool such as https://polymesh.subscan.io/tools/format_transform can be used to convert your stash account address to the required hex public key format.
curl -H "Content-Type: application/json" -d '{"id":1, "jsonrpc":"2.0", "method":"author_rotateKeysWithOwner", "params":["<stash_account_id_hex>"]}' http://localhost:9944 | jq .result
You will get an output similar to:
{
  "keys": "0x4c28da...cfefe26",
  "proof": "0x59e7e5...85901"
}
Record both values:
keys: The concatenated public session keys.proof: The ownership proof required when setting/updating session keys on-chain.
Important behavior changes:
- Each call to
author_rotateKeysWithOwnerrotates to a fresh set of session keys. - Save
keysandproofimmediately; if lost, you must rotate again and re-submit the new values on-chain. - There is no RPC to generate ownership proofs for existing session keys already in the keystore.
- Manual external key generation/insertion workflows that do not produce a proof are not sufficient for setting keys on-chain.
The private keys are stored in a keystore on your operator server in the /<base path>/chains/<chain name>/keystore/ directory. The filenames of these keys are the public key portion of the respective session key, and the file contents represent the private key.
The keys output includes five concatenated public keys in this order: GRANDPA, BABE, I'm Online, Authority Discovery, BEEFY. Prior to the v8 runtime update of Polymesh only 4 keys were generated, excluding the BEEFY key. The keystore will contain a file for each of these keys.
Keystore filenames are prefixed with 4-byte key type identifiers (hex-encoded ASCII), followed by the public key:
gran=6772616e(GRANDPA)babe=62616265(BABE)imon=696d6f6e(I'm Online)audi=61756469(Authority Discovery)beef=62656566(BEEFY)
Example filenames:
617564692ea2449927f86a7d67bb6d83f3052201540b3fdb05d4590e3f14ca8088ffd61b
62616265c6cb0c45331ff2c69dfed5fe58d213e1783f9102f336eeb78eae7c8b1b583339
62656566033be800f15a7ee3bd599d25ad1e3cb1f690cbdc27c3f5e1a68784db804cfefe26
6772616e4c28da7efceb18a51eeb605cd42d9d8b0781e25d33215e89837e6a30fdcca3d0
696d6f6ea0efe6d5be790ad3865df836cfc432908e418e6daa0d1d5fb5c0d27535be1930
Wait until your operator node is fully synced with the chain and production-ready before activation.
Generating Session Keys in Containerized Polymesh Nodes
Our official container images include a utility to rotate session keys without requiring additional tools like curl or exposing unsafe RPC methods outside the container. This utility is located at /usr/local/bin/rotate.
In v8, this workflow requires the owner account ID in hex and returns both keys and proof (equivalent to author_rotateKeysWithOwner).
To run the utility inside your container:
docker exec <container_name> /usr/local/bin/rotate <stash_account_id_hex>
See our guide to running a node with Docker for more details.
Getting the Identity of a Node
In v8+, node network keys are not automatically generated when missing. You should provision a persistent node key (for example via --node-key-file) and back it up. If you intentionally create a new key with --unsafe-force-node-key-generation, use it only for initial bootstrap and remove the flag afterward.
As long as the same node key is preserved, your node peer ID will remain stable across restarts.
There are three ways to obtain the public identity of a node:
- From the operator node logs
- Via an RPC call
- Via the
polymesh key inspect-node-keycommand
From the Operator Node Logs
Start the node process and look for a line containing Local node identity:
2024-11-15 18:50:11 Reserved nodes: []
2024-11-15 18:50:11 Polymesh Node
2024-11-15 18:50:11 ✌️  version 7.0.0
2024-11-15 18:50:11 ❤️  by PolymeshAssociation, 2017-2024
2024-11-15 18:50:11 📋 Chain specification: Polymesh Testnet
2024-11-15 18:50:11 🏷  Node name: woebegone-galley-5149
2024-11-15 18:50:11 👤 Role: FULL
2024-11-15 18:50:11 💾 Database: RocksDb at /var/lib/polymesh/chains/testnet/db/full
2024-11-15 18:50:11 ⛓  Native runtime: polymesh_testnet-7000005 (polymesh_testnet-0.tx7.au1)
2024-11-15 18:50:12 🔨 Initializing Genesis block/state (state: 0xcba3…bce0, header-hash: 0x2ace…d0d6)
2024-11-15 18:50:12 👴 Loading GRANDPA authority set from genesis on what appears to be first startup.
2024-11-15 18:50:13 👶 Creating empty BABE epoch changes on what appears to be first startup.
2024-11-15 18:50:13 🏷  Local node identity is: 12D3KooWSDAHjBmA6j2GyBZPktEz2gLZmtJAc2bWnDV7eCCcgcbC
2024-11-15 18:50:13 💻 Operating system: linux
...
In this example, the node's identity is 12D3KooWSDAHjBmA6j2GyBZPktEz2gLZmtJAc2bWnDV7eCCcgcbC. Save this value, then terminate the process.
Via RPC Call
Call the system_localPeerId method and read the result value:
curl -s -H "Content-Type: application/json" -d '{"id":1, "jsonrpc":"2.0", "method": "system_localPeerId", "params":[]}' http://localhost:9944 | jq -r .result
Metrics and Monitoring
The recommended method for obtaining metrics is through the node's built-in Prometheus exporter. By default, it binds to localhost on port 9615. Use the --prometheus-external flag to expose the exporter port for network-based scraping, or deploy a local agent (e.g., telegraf, grafana-cloud-agent, or victoria-metrics-agent) to collect metrics.
Polymesh-Specific Metrics
The basic health of a node can be assessed by monitoring the following metrics:
| Metric | Purpose | Range | Notes |
|---|---|---|---|
polymesh_block_height{status="finalized"} | Finalized block number | ±3 from network average | Verify against the network block number using an external source. |
polymesh_block_height{status="best"} | Best block time | 6s ±2s | Ideal mean block time is 6 seconds; minor variations are normal. |
polymesh_ready_transactions_number | Transactions in ready queue | 0–150 | A growing queue may indicate node latency issues. |
polymesh_sub_libp2p_peers_count | Number of peers | > Minimum peer count | Nodes should maintain connectivity with other operator nodes, ideally with a maximum of three hops to any other operator. |
Guides for monitoring other Substrate-based chains, such as Polkadot, can be referenced for additional approaches to node monitoring.
General Node Metrics
In addition to Polymesh-specific metrics, you should monitor basic node health metrics available from generic node exporters or monitoring agents:
| Metric | Range | Notes |
|---|---|---|
| Free disk space | 30 GB+ or >20% capacity | Ensure sufficient free space for the node to function properly. |
| Free RAM | 1 GB+ | Spikes are acceptable, but an average of 1 GB of free RAM should remain available. |
| CPU usage | 5–50% (overall) | If usage consistently exceeds 50%, consider increasing CPU resources. |
| Network connectivity | >0.1 Mbps bandwidth | Maintain stable connectivity. If under attack (e.g., DDoS), deploy new nodes or restrict connectivity to trusted peers. |
Bonding POLYX
Ensure your Polymesh nodes are fully synced and healthy before proceeding. Failure to do so may result in operator penalties.
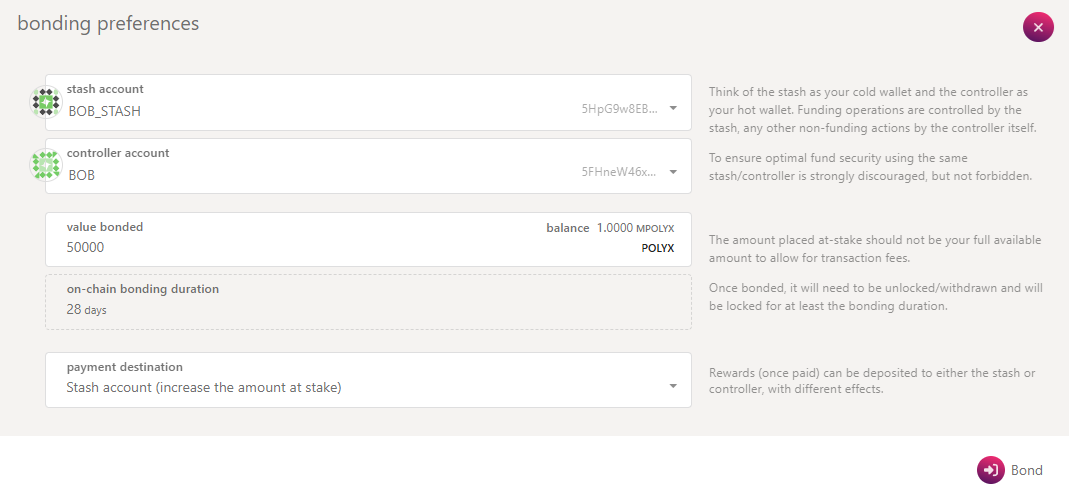
To become an operator on Polymesh, you must bond (lock) some POLYX. The account holding the bonded funds is called the stash account, while the account managing these funds is the controller account.
Recommendation: Use separate accounts for your controller and stash accounts. Ensure both accounts have enough POLYX to cover transaction fees, while keeping the majority of your funds in the stash account, as it serves as the custodian of your staking funds.
Note: The steps in the following sections can also be completed in a single batched transaction by selecting the [+ Validator] button. The instructions below focus on each individual step.
Steps to Bond Funds
-
Navigate to the Staking section.
-
Click Account Actions.
-
Select the [+ Stash] button.
-
Complete the following fields:
- Payment destination: Specify where validation rewards should be sent.
-
Click Bond and sign the transaction using your stash account. After a few seconds, an
ExtrinsicSuccessmessage should appear. Refresh the page if necessary to view your new bonded account details.
Setting Session Keys
Session keys link your operator node to your controller account. If you switch operator nodes, you can update these keys to reflect the new setup, which will take effect in the next session.
Use the session keys generated during your operator node setup.
Steps to Set Session Keys
-
Go to the Staking section.
-
Click Account Actions.
-
Locate your bonded account and click Session Key.
-
Paste the
keysvalue from theauthor_rotateKeysWithOwnerresult (generated earlier) and provide the correspondingproof. -
Click Set Session Key and submit the extrinsic.
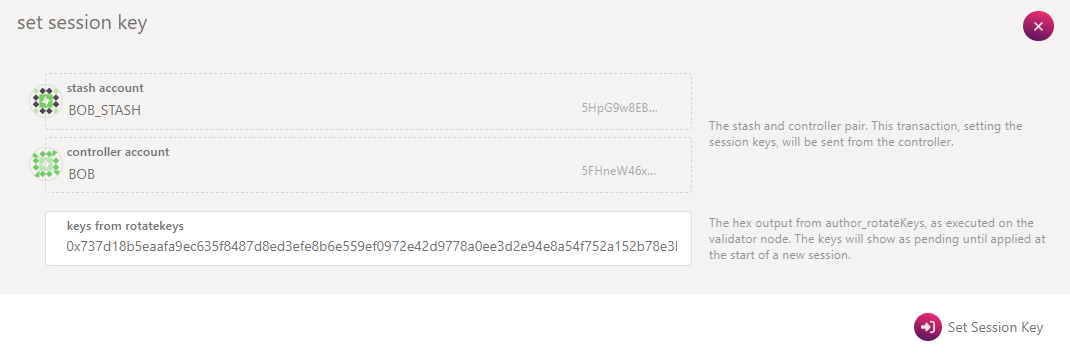
Once the transaction succeeds, your session keys will be updated, and you're ready to proceed with validation.
Activating Your Operator Node
Before activation, ensure your setup is verified via telemetry. Improper configurations may result in penalties.
Steps to Activate
-
In the UI, click Validate.

-
Enter your reward commission percentage, then click Validate. At the time of writing, the maximum allowable commission is capped at 10%.
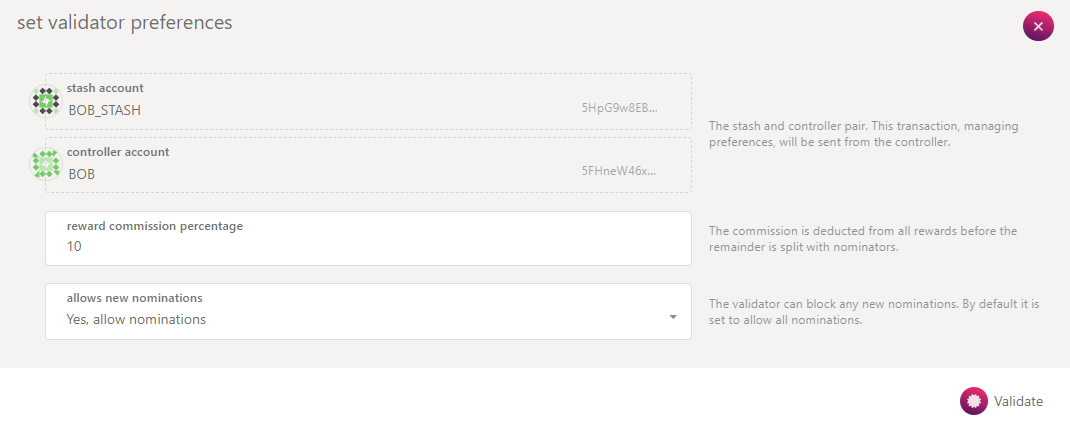
Congratulations! Your operator has been added to the queue of available operators. It will be eligible for election in the next operator cycle and will become active at the start of the subsequent era. On Mainnet, this process may take up to 29 hours from setting your validator preferences.
Stopping Operator Activity
To stop operating as a validator:
- Navigate to Staking > Account Actions.
- Locate your bonded account and click Stop.
- Sign the transaction to confirm the action.
This action removes your node from the list of operators available for election. Your node will remain active for the current era but will become inactive at the start of the next era following its last election.
Important: Only stop your node client after it is no longer active in the current era to avoid penalties.
Reward Destination Considerations
If your reward destination is set to your Stash account (increase the amount at stake):
- Wait until the last reward payment has been received before starting the unbonding process.
- Alternatively, change the reward destination to Stash account (do not increase the amount at stake) before unbonding to ensure the final reward payment is not bonded.
By doing so, you can ensure the smooth receipt of all pending rewards without interruptions.